Shorten a painful learning curve + SOLUTIONS ADDED

Crossbow Hunting

Moderator: Excalibur Marketing Dude

TheTinker
Posts: 263
Joined: Sun Jan 06, 2013 2:28 pm
Location: Pacific Northwest, USA

Shorten a painful learning curve + SOLUTIONS ADDED

Post by TheTinker »

I believe in sharing boo-boo's as well as achievements with our brothers here. This afternoon I learned about removing a seized Alan head scope rail screw and point out that it should be avoided at all costs. So here goes:

After initially receiving my 355 I had to take it apart and see what makes it 'tick' and check all the screws. I am that kind of guy just as I suspect several of you are also. Anyway, I did not have blue thread lock-tite but did have some on hand that I have used in the past on numerous scope and sight screws (slotted and Alan headed) with never any difficulty in removing them. So, logic would be that it would work the same on the 355, eh?

This afternoon I wanted to remove the scope rail and discovered that the four dome-headed screws with their puny .093 Alan socket were tighter than the hubs of hell. Not being one to surrender to a project, a .093 key was clamped in the vise in such a manner that I could put my whole shoulder behind it as I torqued the assembly in a counter-clockwise rocking motion. The Craftsman (good quality) key was visibly twisting as it was worked back and forth and suddenly it came loose with a "pop". Great! Two more samo-samo... Number four was an obstinate SOB. With three out of four you cannot stop there, so I leaned on it till the hex-hole became round, as the Alan key stripped it out. What now? :cry: "Jeeez"...

I have (carefully) drilled out steel screws from a steel block, but this bugger was an aluminum block. No room for error or the bit will track into the housing and really screw it up. NOT looking forward to this challenge but no choice so lets get at it. I clamped the assembly in the drill press vise and tediously lined it up as best as I could to put the center drill right down the center of the screw head. The head had just popped off exposing the drilled hole in the scope rail when the phone rang....

Low and behold it was Danny Miller himself, what are the chances? :wink: Told him of the asinine error I had made and he informed me that when he has strip-outs in the trigger block he runs a 10x32 tap thru the hole and makes it one size oversized... works fine. He is dropping a new set of screws into the mail for me. How is that for service :lol:

Back to the story. [This is meant to be painful to keep you from having to do the same thing] It is not bad enough that you are trying to get a locked-in steel stub out of a block of aluminum, the bloody rail is now between where you are and the actual point where the screw goes into the block. So; a drill large enough to erase the screw outer diameter has to skim thru the scope rail for about a tenth of an inch so you can get the rail out of the way to see what you are doing! Now; Carefully, very carefully the drill center is checked for being in the center of the screw. A couple Hail Mary's and a smaller bit is run through the screw and the hole is progressively increased in size until you can detect threads appearing. A little judicious work with a carbide cutter in a Dremel tool 'cause I was a hair off-center and the steel threads can be carefully picked out of the hole. Now, the hole can finally have a tap clean the hole VERY carefully.

Viola! All fixed like it belongs :?

God only knows what would have happened if more than one screw would have been seized. The scope rail could not have been removed for at least one of them and surely one would have gone South 'cause you would not have had the ability to re-check your center after getting past the tenth inch scope rail.

I don't know about you, but bet in the future I will use clear nail polish or a lock-tite I KNOW I can break loose with that little pi$$-ant sized Alan key :evil:
Last edited by TheTinker on Mon Mar 04, 2013 7:24 pm, edited 1 time in total.
User avatar
robertyb
Posts: 2846
Joined: Mon Feb 06, 2012 8:35 pm
Location: Georgia

Re: Shorten your painful learning curve

Post by robertyb »

I tried also. Both my front screws popped loose after a lot of pressure was applied. Both of the back ones stripped out.
I am trying to decide to just leave them or maybe dremel a slot across them and use a screwdriver. I put a torch to them for about 30 seconds to break the bond before they stripped so I am not positive that a screwdriver will work or if it will just pop a head off. They act like they are welded in place.

I might take them to a machine shop. They have the proper toools that I lack.
Wildlife Population Control Specialist
Mister B
Posts: 297
Joined: Wed Jun 30, 2010 1:58 pm
Location: Deep East Texas

Re: Shorten your painful learning curve

Post by Mister B »

Welcome to the club Joe and Robert. All four of mine stripped out when installing my Guardian type ADF on my 355 so I went to Harbor Freight and got a screw extractor set, drilled a tiny hole into the screw, inserted the smallest remover bit in my drill, hit reverse and they all came out.
This is the fourth ADF unit I have installed and each one had at least one stuck screw. I put ADFs on all mine and my grandkids Excals. I used blue Loc Tite on them, hope I don't have to try and remove them..Cheers...Wayne
Micro nightmare (Mini Pearl)
Matrix 355 (the Shrike)
Matrix 330 (the Mini-Mag)
Rage Extreme & slick trick mag BH
Diablo arrows with 2"blazers and Laser II and
BE executioners with 3" Duravanes
Normous
Posts: 8292
Joined: Tue Jan 03, 2006 3:04 pm
Location: Windsor, Ontario.

Re: Shorten your painful learning curve

Post by Normous »

When I encountered this and I have, some heat helps a lot. A mini touch with the flame set on low directly on the domed scope mount screw is helpful. Also make sure your allen key fits well, if it is worn or rounded grind it down some.
EXCALFFLICTION 1991 ->>----------> 2024
Matrix 355
Huskemaw and Leupold crossbow optics.
Boo Strings
SWAT BH's and TOTA heads.
Teach Your Family How To Hunt So You Don't Have To Hunt For Your Family
User avatar
Ont_Excal
Posts: 2094
Joined: Mon Dec 19, 2011 12:30 pm
Location: Beautiful nth shr of Lk Erie

Re: Shorten your painful learning curve

Post by Ont_Excal »

enormous wrote:When I encountered this and I have, some heat helps a lot. A mini touch with the flame set on low directly on the domed scope mount screw is helpful. Also make sure your allen key fits well, if it is worn or rounded grind it down some.
To apply heat to a small area such as the head of a small machine screw, I use an old electric soldering gun.
You can control the amount of heat very well and apply to a very small area without putting heat to the whole assembly.
"Death leaves a heartache no one can heal. Love leaves a memory no one can steal"
User avatar
Boo
Posts: 14367
Joined: Thu Dec 29, 2005 11:04 pm
Location: Newtonville, Ontario, Canada
Contact:

Re: Shorten your painful learning curve

Post by Boo »

I've removed a whack of the screws that hold the scope mount to the trigger unit. This is what I do. But first keep in mind what happens to cause difficult removal. When the screws are driven in the metal under the heads galls, rolling the metal under the head causing it to be super tight right after being driven in.
Remove the scope.
Use an allen socket.
Put the allen into the hole of the screw and beat in in like it owes you money. This will temporarily compress the threads breaking the bond between the allen head and the aluminum and ensure proper seating of the allen socket.
Using a ratchet, push with your thumb or palm and turn.

Now if you screw up and round out the allen what you can do is put in an allen key and put a torch to the allen key. The heat will transfer to the screw.
Alternatively I drill out the allen socket and use a commercial extractor.
Last edited by Boo on Mon Mar 04, 2013 1:03 am, edited 1 time in total.
Some people just like stepping on rakes
User avatar
ngamokai
Posts: 188
Joined: Sun Jan 06, 2013 9:25 pm
Location: New Zealand
Contact:

Re: Shorten your painful learning curve

Post by ngamokai »

AHHHH if it aint broke don't fix it :lol:
Dream as if you'll live for ever, Live as if you'll die today!
http://www.bowandfishnz.com
KATIPO matrix 380 blackout
User avatar
ngamokai
Posts: 188
Joined: Sun Jan 06, 2013 9:25 pm
Location: New Zealand
Contact:

Re: Shorten your painful learning curve

Post by ngamokai »

Boo wrote:Now if you screw up and round out the allen what you can do is put in an allen key and put a torch to the allen key. The heat will transfer to the screw.
Alternatively I drill out the allen socket and use a commercial extractor.

:lol: spoken like a true mechanic :cool:
Dream as if you'll live for ever, Live as if you'll die today!
http://www.bowandfishnz.com
KATIPO matrix 380 blackout
snuffbox
Posts: 464
Joined: Thu Aug 11, 2011 3:33 am
Location: NW London

Re: Shorten your painful learning curve

Post by snuffbox »

I had the same problem and ended up buying a set of high quality Allen keys ,applying heat from a butane blow torch and then a lot of pressure.
Three came out ok but there's always going to be one and that one rounded.
I used the dremel to cut a slot,applied heat again and out she popped.
One of my local dealers sent me a new set of screws that had the same size threads but a sensible sized allen head ,not the prissy little dome head.
Those dome heads are the only bad thing I've found on an Excalibur.
The screws that were sent to me were a bit long and needed cutting down.
Problem solved.
flightattendant100
Posts: 4806
Joined: Thu Jul 30, 2009 5:06 pm
Location: Ft. Worth, Texas

Re: Shorten your painful learning curve

Post by flightattendant100 »

Shade Tree TEXAS Hick Method! On screws that are exposed head like the pan head screws that hold the scope mount on , take a dremel with a metal cutting disc and slot the head. Now get your big ol' nasty looking slot driver thatis so big you usually only use it to pry stuff and have a go! The screws are ugly but can be replaced. Moral of the story is you can put a BUNCH more UMPH on it with a slot than those purty little allen head suckers.
NOTE: To keep this from ever happening again, clean and degrease new screws and use 100% clear silicone on the screw thread. Sets up like rubber, will never vibrate out, and you can take it out easily with one of those itty bitty allen wrenches.Never had one come loose yet and have mounted scopes on BIG handguns with this procedure.Life is too short to make it hard on yourself!
TheTinker
Posts: 263
Joined: Sun Jan 06, 2013 2:28 pm
Location: Pacific Northwest, USA

Re: Shorten your painful learning curve

Post by TheTinker »

This looks like a good pro-active preventative measure.

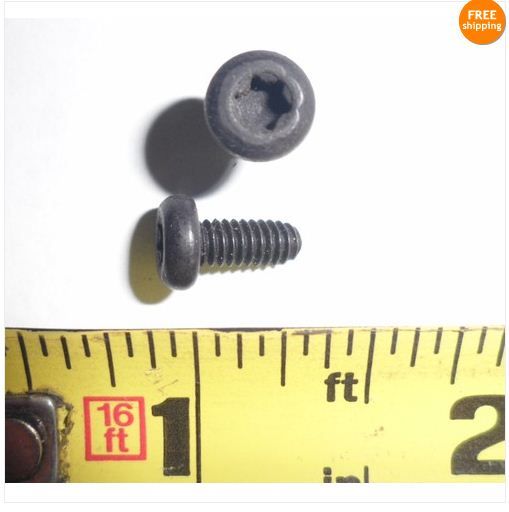
T-20 torx socket in a button socket head 8x32 cap screw. Aircraft grade/black oxide.
http://www.ebay.com/itm/50-ea-8-32-x-3- ... 35bf94bb27

Image

These will require shortening of .025 on the front screws.
'Bet a T-20 torx will not fail you like the puny little Alan hex head does.
Yep, I ordered them ... would pay $14 ANYTIME to avoid several hours of tedious labor like described earlier. Cheap insurance :wink:
Cheers, Tink
Hi5
Posts: 1622
Joined: Fri Aug 06, 2004 1:56 pm
Location: Manitoba

Re: Shorten your painful learning curve

Post by Hi5 »

TheTinker wrote:This looks like a good pro-active preventative measure.

T-20 torx socket in a button socket head 8x32 cap screw. Aircraft grade/black oxide.
http://www.ebay.com/itm/50-ea-8-32-x-3- ... 35bf94bb27

Image

These will require shortening of .025 on the front screws.
'Bet a T-20 torx will not fail you like the puny little Alan hex head does.
Yep, I ordered them ... would pay $14 ANYTIME to avoid several hours of tedious labor like described earlier. Cheap insurance :wink:
Cheers, Tink


If I knew you smoked, if I knew who you are, If I knew where you are, and if I had any cigars, I'd be sending some you you!!

Like they say, "Give the man a cigar!"
"Gun Control Laws"--trying to nag criminals into submission.
TheTinker
Posts: 263
Joined: Sun Jan 06, 2013 2:28 pm
Location: Pacific Northwest, USA

Re: Shorten your painful learning curve

Post by TheTinker »

Thank you sir, but I don't smoke.
Now a little GENTLEMAN JACK or CROWN ROYAL now and then maybe... :?

:idea: Actually, thanks for the thought... headin' for JACK over ice...
strum
Posts: 3889
Joined: Tue Sep 07, 2010 5:35 pm
Location: Blairsville Ga.

Re: Shorten a painful learning curve + SOLUTIONS ADDED

Post by strum »

this is also an issue i had and used the dremel method ..then i did what Boo said and got me some 1/4" tips i can put in a ratchet or a nutdriver..
those torx heads should work tinker..
i havent figgered out why those crappy screws are used..
Micro RTX
Nikon Bolt XR
BEE Arrows
Slick Trick Magnum
Unshot Beta Chrony
John3:16
TheTinker
Posts: 263
Joined: Sun Jan 06, 2013 2:28 pm
Location: Pacific Northwest, USA

Re: Shorten a painful learning curve + SOLUTIONS ADDED

Post by TheTinker »

strum wrote:this is also an issue i had and used the dremel method ..then i did what Boo said and got me some 1/4" tips i can put in a ratchet or a nutdriver..
those torx heads should work tinker..
i havent figgered out why those crappy screws are used..
Maybe Marketing Dude will have an epiphany :wink:
Post Reply